
Adding Photos and Photo Albums
iWeb provides templates for pages that contain mainly photos and movies instead of
text.
 The Photos template includes a photo grid that automatically sizes and positions
each photo as you add it and provides a placeholder caption for each photo. It also
includes a Play Slideshow button that your visitors can click to view your photos as a
slideshow.
Inserting fixed and floating objects
If you want to place an object (including photos and other graphics) in the middle of
text or somewhere that doesn’t have a placeholder graphic, there are two ways to do
it: as a fixed object or as a floating object.
Fixed objects are inserted outside of text boxes. You can drag a fixed object
anywhere on the page and it won’t affect text or be affected by text or other objects.
Floating objects are inserted within text and get pushed along as the text grows.
If you place an object inside a text box, it must be a floating object. You can wrap text
only around floating objects. For more information, see iWeb Help.

12
Chapter 2
Learn iWeb
 The My Albums template creates an index page for multiple photo and movie
albums. Each album is represented on the page by one of the album’s photos.
Movies are represented by their poster frames. Visitors click a photo or poster frame
to view the album or watch the movie. When visitors move their mouse over the
album, they see a mini-slideshow.
Note: You can add photos and movies to any page (not just pages created with the
Photos or My Albums templates) by simply dragging them to the page. However, only
pages created with the Photos or Movies templates can be added to the My Albums
index page.
For this tutorial, you will add a Photos page and a My Albums page to your website and
add your photos and albums to them.
To add a Photos page:
1
Click the Add (+) button (or choose File > New Page).
2
In the template chooser, select a theme in the list on the left.
3
Select Photos from the templates on the right, and then click Choose.
The new page contains a photo grid with placeholder photos.
4
If the Media Browser isn’t open, click Media in the toolbar and then click Photos.
5
Choose the Event or album that contains the photos you want to add.
6
Select the photos from the thumbnails at the bottom of the Media Browser.
You can Shift-click multiple photos or Command-click photos that aren’t next to each
other.
7
Drag the photos to the photo grid on the Photos page.
A blue line appears around the photo grid when you drag the pictures over it. When
you drop the photos on the photo grid, they replace the existing placeholder graphics.
If you drag only one photo, all the extra placeholders in the photo grid disappear. Don’t
worry, though—the next photo you drag to the photo grid will be automatically
formatted like the first one, using the same style and size. You can add up to 500
photos or movies to an album on a Photos page.
8
Click the placeholder text below each photo and type a caption.
With your photos in place, now you can adjust the layout of the photos on the photo
grid. Just drag the photos to rearrange their order.
Chapter 2
Learn iWeb
13
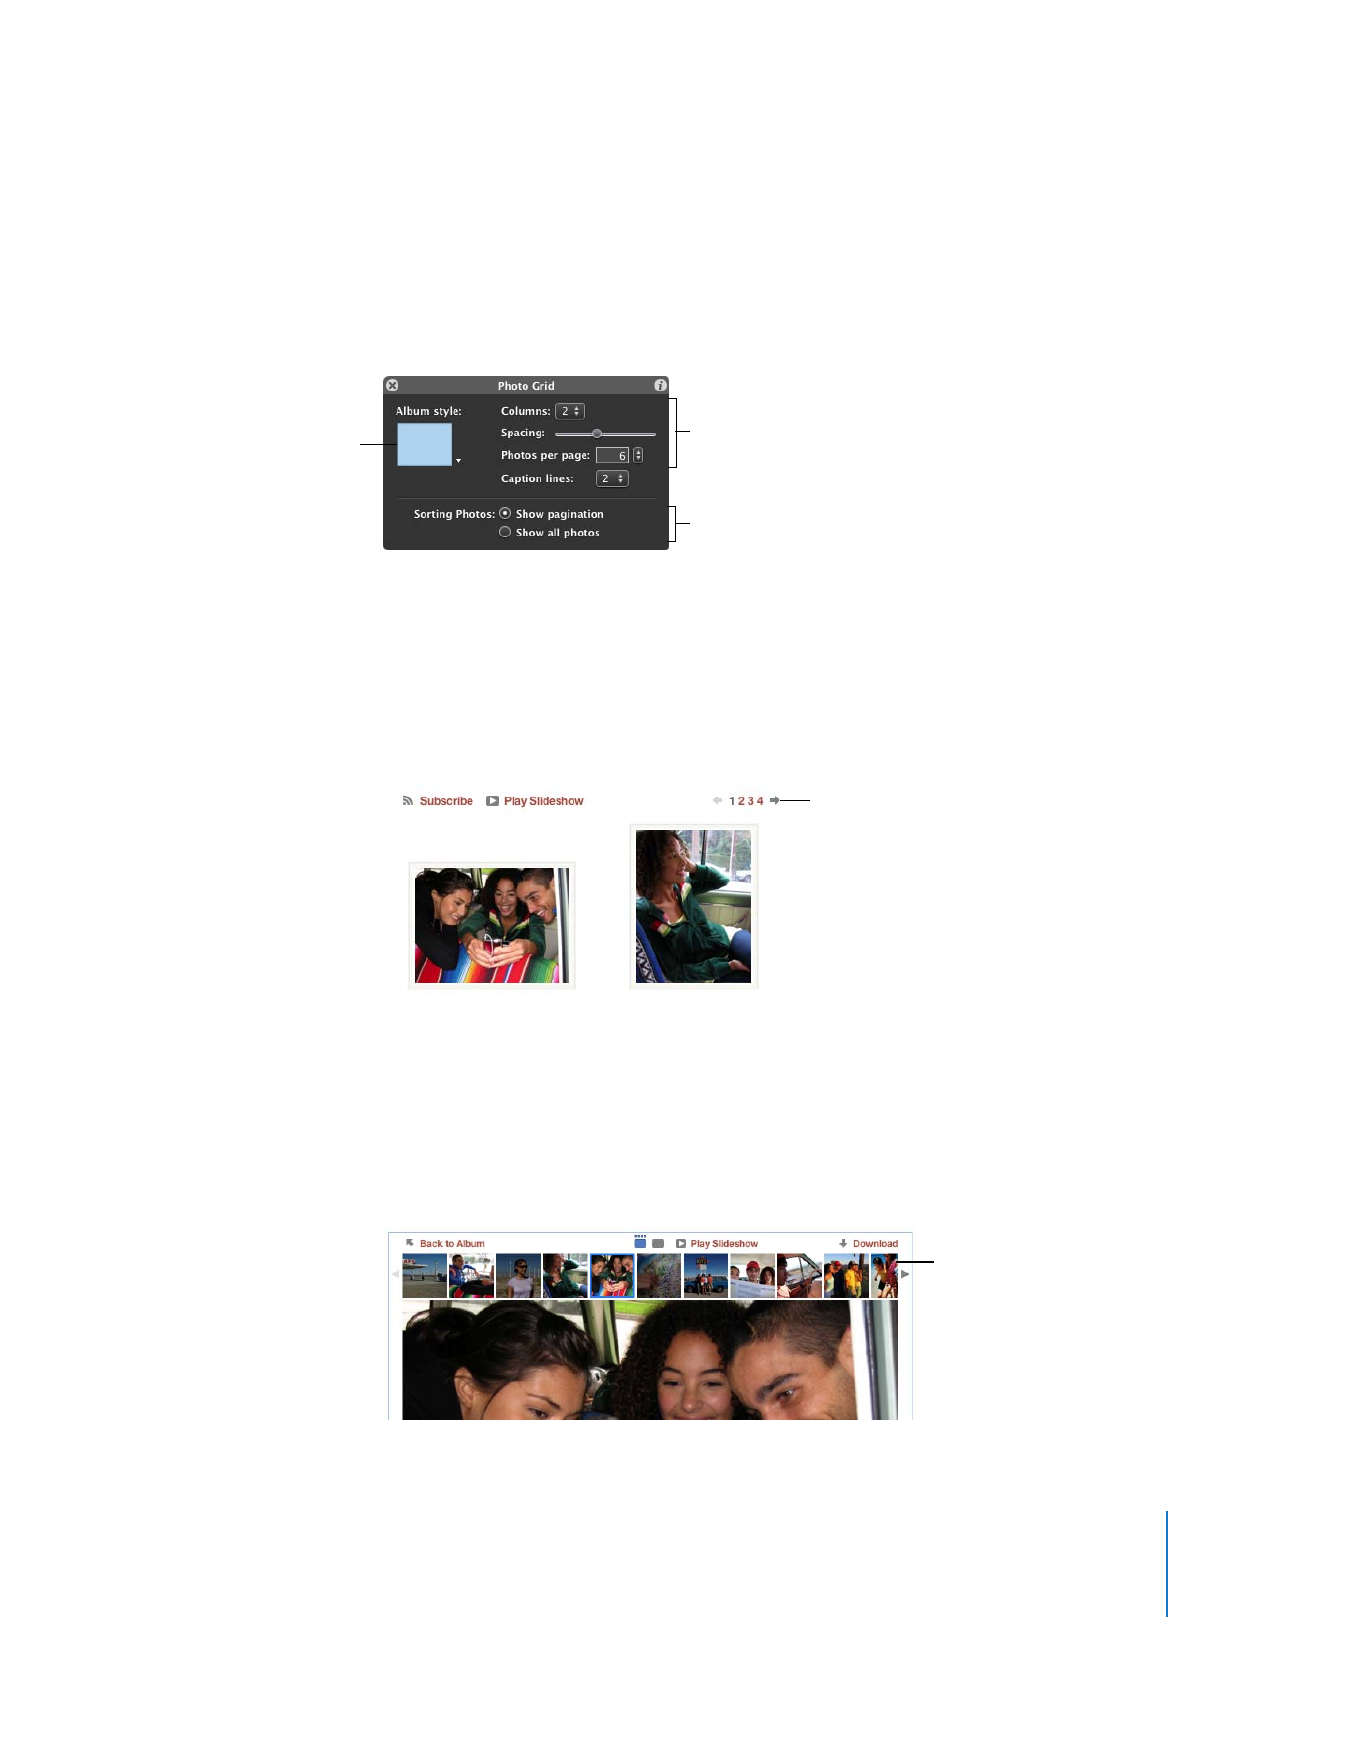
When you click a photo, a Photo Grid window appears. Use the settings in this window
to change the style of the frame for all the photos on the page, change the number of
columns, turn captions on or off, and more. For more information about using these
settings, see “Changing the layout of photos on a Photos template” in iWeb Help.
If the number of photos in the photo grid exceeds the “Photos per page” setting in the
Photo Grid window, iWeb divides the photo grid into multiple pages for your photos
and adds page numbers and navigation arrows.
Another way to organize your photos is to use the detail view. When you double-click a
photo on a Photos page, the photo is enlarged so you can see it in more detail. Click
the view buttons at the top of the detail window to see thumbnails of the photos in a
photo browser across the top. When you click a thumbnail in the photo browser, the
enlarged photo is shown below. Visitors to your website will also be able to see this
view when they click a photo on your Photos page.
While working in iWeb, select
to view page numbers on
paginated Photos pages, or
view one scrolling page. This
setting does not affect the
visitor’s view.
Choose a frame style.
Change the layout of
photos on the photo grid.
Page numbers and
navigation arrows appear
when there are more
photos than the “Photos
per page” setting.
Click thumbnails to see
the photo enlarged
below. Click the arrows
to see the previous or
next set of thumbnails.

14
Chapter 2
Learn iWeb
Adding Multiple Photo Albums to a Page
If you have several photo or movie albums, you can create a My Albums page to
provide a single index page for all of your albums. Instead of seeing many albums in
your website navigation menu, visitors can click the single link for your My Albums
page and instantly have access to all your albums.
When visitors to your My Albums page move their mouse over albums, they can view a
slideshow within the album frame without leaving the page. When they click the
album, the album opens and they can view the pictures in a larger slideshow.
To add a My Albums page:
1
Click the Add (+) button (or choose File > New Page).
2
In the template chooser, select a theme in the list on the left.
3
Select My Albums from the templates on the right, and then click Choose.
The new page contains an album grid with a placeholder album.
4
Drag your Photos page from the sidebar to the album grid on the My Albums page.
When you drag photo albums from the Media Browser onto the album grid, iWeb
automatically creates a Photos page for the album and adds it to the My Albums index.
To reorganize albums on a My Albums page:
m
Drag the Photos pages (under My Albums in the sidebar) into the order that you want
them to appear.
Click an album to see the Media Index window, where you can set the number of
columns, adjust spacing, and make other adjustments to the layout of the page. You
can change the transition effect between photos by choosing an option from the
“Album animation” pop-up menu.
Experiment with adding photos and albums and adjusting the layout of the Photos and
My Albums pages. You can find more information in iWeb Help.